Latest Entries »

About a month ago, I brought a 3D printer from Chicago to Recife, Brazil – smack in the tropics and right on the ocean.  A glass of cold water gets covered in a film of moisture in about 10 seconds.  The cool ocean breeze hides the fact that it is humid here, as my rusty tools can attest.

This is why I missed the class on how PLA 3D printer filament soaks up water like a sponge.  I saw the results of this when I tried printing a luggage tag for a friend.  The first attempt (shown on the right side of the picture below) was awful.  Aside from appearance, it was spongy since the filament didn’t fill in the shape.  Also, the filament jammed in the extruder, and I had to take everything apart to fix it.  Twice.

humidity

Once I figured out the problem, I found a quickish solution, and the new tag came our perfectly as you can see from the left side of the image above.

First, when PLA (or ABS, for that matter) sucks up water, it expands the filament, leading to extruder jams.  Second, as the filament moves through the heater, the absorbed water turns into steam that keeps the filament from extruding properly.  The resulting print was spongy because of all the holes caused by the steam escaping the print nozzle.

So – how do you fix this?  First, move to Arizona.  OK, just kidding.

I took the bad spool of filament and put it in the oven at about 60C.  You don’t want to get much hotter than this because the filament will soften, and you’ll lose the whole roll.  As it was, the spool itself warped pretty badly, but the filament dried our pretty well after 2 hours in the oven.  With no further protection, it worked pretty well for about a week.  (Did I mention how humid it gets here?)

The next step is to keep dry filament in an airtight plastic container with reusable dessicant packs that keep everything inside nice and dry, and can be recharged when they lose their oomph.  Amazon sells several kinds, and also sells low-cost digital thermometers with humidity gauges so you can see how nice things are in your box.

My friend, Bill Steele, from Polar3D, had another great suggestion.  Use a big enough box to let you run a rod through the sides (a toilet plunger handle works well) to let the spool of filament turn.  Then, put a tiny hole in the lid through which you can get the filament out and feed it to your printer.

While humidity is not a problem everywhere, it is a challenge in some parts of the US, so pass this blog entry to your friends who might benefit from it.  I spent a week puzzling this out, and I’d like to save time for those who might benefit from these ideas.

Now go print something outrageously fabulous!


Non-violence

Nationwide protests are a logical outcome of the recent seemingly unprovoked attacks on black people by police.  But in too many cases, these protests have become violent.  This violence diminishes the impact of the protests and takes the focus away from the purpose of the protests in the first place.

This generation of protesters should explore the history of non-violent protests during the civil rights struggles of the 1960’s.  By refusing to be baited by those who wanted us to “mind our own business,” we ended up winning some major battles.

I remember my involvement in helping blacks getting registered to vote in southern Illinois in the late 60’s.  When confronted by those who disagreed with us, we held our

civilrights

The epitome of non-violent protests

ground and sang songs (“I shall not be moved” was a personal favorite) as we were hit with axe handles and had urine thrown in our faces.  We were taught to shield our bodies as best we could, but not to strike back.  Even as the German Shepherds dragged us to the police cars where we were arrested for “disturbing the peace,” we continued to sing and never once tried to strike back.

Looking back on that time, I believe to this day that we made a difference – and that this would have been diminished if we struck back.  Today’s protests will be far more effective if the protesters are non violent – no matter what the provocation may be.

Like a tree that’s planted by the water
I shall not be moved.


This year’s ISTE conference in Denver was quite interesting. Norma and I spent most of our time in the HyperDuino booth showing our new CubeSat using Roger Wagner’s HyperDuino system. This CubeSat was the subject of my recent Instructable that received thousands of visits almost as soon as it was released!

The main activity at the booth, though, involved visitors learning how to use HyperDuino as a tool for student projects. After learning how to do it themselves, they were encouraged to show someone else how to do the same thing, at which point they would received a full HyperDuino kit to take home. Even though the booth location was near the back of the exhibit hall, it was packed three-deep with people most of the time.

IMG_3217

HyperDuino booth on a slow day

A brief tour of the hall showed that there were a few other booths (e.g., Fablevision) that were similarly packed, and a large number of booths with few attendees. The well-attended booths engaged people in learning through the building of artifacts, and the sparsely attended booths focused on telling people about a product or service.

It quickly became obvious that verbs were more important than nouns – that “doing” was more popular than “knowing.” In some ways this is reflected in the popularity of Maker Faires, and ties in with Dewey’s quote that he didn’t care what a child knew, but what he could do with what he knew. Dare I think this means we are finally ready for progressive education? I think so! The Next Generation Science Standards represent a tectonic shift in pedagogy, and – consciously or not – this year’s ISTE attendees seemed ready for it.

In the last few years, we’ve visited flagship Maker Faires in San Mateo, California and New York City where we got to hang out with over 100,000 kindred spirits for whom tinkering is a critical component of life.  While formal Maker Faires are a fairly recent phenomenon, the educational application of “making” dates back to the dawn of the previous century when John Dewey said that what a child knew was not as important as what he did with what he knew.  This perspective from the Father of Progressive Education remained central to the thinking of educational leaders like MIT Professor Seymour Papert who, in the early 1990’s, coined the word “constructionism” to describe the process of building representations of knowledge separate from the learner himself. (Papert, Seymour, and Harel, Idit. “Situating constructionism.” Constructionism 36 (1991): 1-11.)

Even libraries have joined the movement with public “makerspaces” being added to facilities previously dedicated to quiet, paper-based, research.  As Erica Compton from the Idaho Commission for Libraries has said, “Libraries need to become more like kitchens and less like grocery stores ― a place where patrons are able to construct knowledge, where they can create, build, make and be actively engaged.”

One would think that a recent surge in constructionist activities has taken the world by storm, perhaps at the expense of reflective thought or of activities of value, even if they don’t result in artifacts.  Well, as far as traditional schooling goes, the progressivist philosophy of Dewey has yet to become the norm.  To be fair, every school has students engaged in making things.  Whether it is a science fair project displayed on a tri-fold board, or more complex constructions, every teacher engages students in some sort of project that requires “making.”   But it is the rare school that embraces the “making” philosophy across the curriculum.

As a product of a progressive public high school in Chicago, my life was pretty equally split between hand-based and head-based learning.  And, it was the work we did with our hands that made what we learned with our heads “stick” and make sense.  As a result, my first year in Engineering at Northwestern University was basically a walk in the park.

While any subject at any grade can benefit from a rich “making” component, the STEM fields are clearly low hanging fruit in this regard.  There are two reasons for this:  First, the scientific method is based on the testing of conjectures through experimentation and our curricular interest in technology and “coding” (programming) feeds into “making” as well.  Second, the Next Generation Science Standards and (to a lesser extent) the Common Core State Standards in Mathematics mandate the use of inquiry and project-based learning as the vehicles through which these subjects are navigated.

And, yet, in too many schools the ground in which these forces are planted lies fallow.  The time has come to change this, and the tools needed are inexpensive and easy to get.  We’ll describe some of these tools, but first there is another topic to explore: the physical structure of school.  According to the architect Prakash Nair, too many schools are built around “bells and cells.”  Children move from place to place at fixed intervals and (especially in the upper grades) sit in rooms at desks all facing the front so they can harvest the wisdom imparted from their teacher.  It is a rare school that allows the free flow of students from place to place and lets them work on projects as long as they need to.

While the incorporation of makerspaces in traditional schools is possible, there is a long way to go if the goal is deep pedagogical change.  In some cases, schools have a STEM lab where groups of kids work on a variety of projects with the freedom to move from place to place as needed.  Except for the burden of bells, such environments can be quite productive ― functioning more like studios than classrooms.  For many, this is a great first step, but it carries the risk that it will be isolated in fear that the practices there would infect other rooms.  As Professor Papert asked on numerous occasions, “What would be the impact of the pencil on education if you had to go to the pencil lab to use one?”

On the classroom computer front, it might appear ― at first glance ― that recent trends are moving us further away from supporting a culture of making.  The reason I say this is because Chromebooks are now the number-one computing platform in America’s schools.  Since Chromebooks rely on cloud-based applications, traditional software is no longer supported, leaving users at the mercy of those developers willing and eager to create applications that can be run over the Internet.  Also, it was not clear at the start how Chromebooks would accommodate maker hardware like 3D printers, and robotics control devices like the popular Arduino board.

Screen Shot 2016-04-13 at 2.28.56 PM
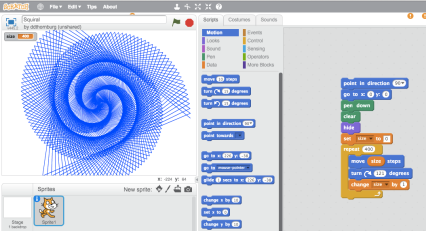
It turns out these fears are unfounded.  In the domain of student programming, for example, everything from MIT’s Scratch (scratch.mit.edu) to Terrapin Logo has (or will soon have) versions that work splendidly on Chromebooks  This helps move the Chromebook from a content delivery platform to one that supports unbridled student creativity.

With the current interest in students learning to program (coding) these developments are welcome.  In some ways this harkens back to the early days of personal computing when there was little commercial software, and students had to learn to write programs themselves.  Of course, the programming world has changed a lot since the early 1980’s with construction block languages like Scratch coexisting with text-based programming languages like Logo and Python.

Of course, with programming languages, the results reside on the computer screen.  With peripherals like the Arduino, computer programs can interact with remote sensors and output devices like lhyperduino
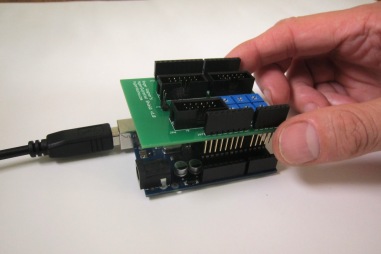
amps and motors.  Using tools like HyperDuino for Chrome (www.hyperduino.com) students can build projects that bridge the virtual and physical worlds.

A popular starting point for HyperDuino is the making of interactive tri-fold displays where, by touching certain areas of the display, the computer might play a video and lights on the physical display turn on to show the area being explored at that time..

Screen Shot 2016-04-13 at 7.47.09 PM
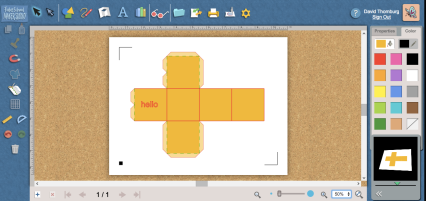
More elaborate constructions can be made using the Fab@School Maker Studio software (www.fablevisionlearning.com) that cuts out elaborate paper shapes designed by students using the Silhouette computer controlled paper cutter.

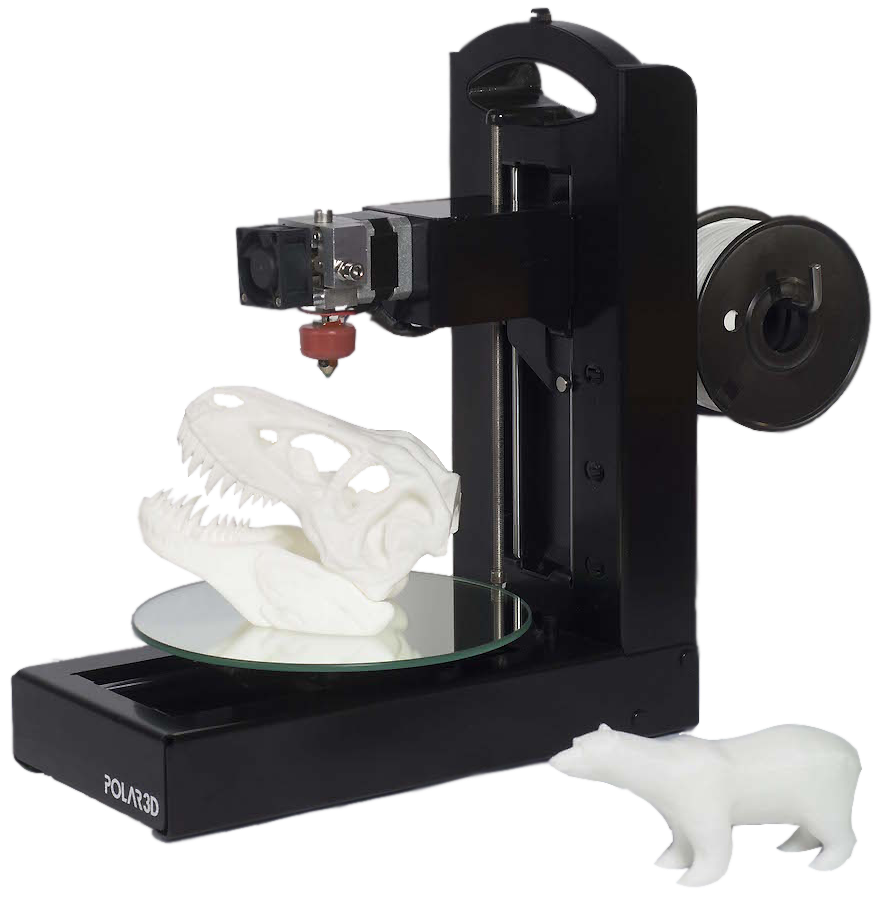
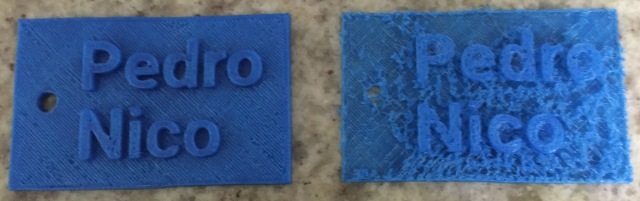
Even 3D printers have joined the cloud, making them work perfectly with Chromebooks as powerful tools for making.  Two companies with excellent cloud-based printers are Polar3D (www.polar3d.com), and New Matter (newmatter.com).

Screen Shot 2016-04-13 at 9.51.38 PM
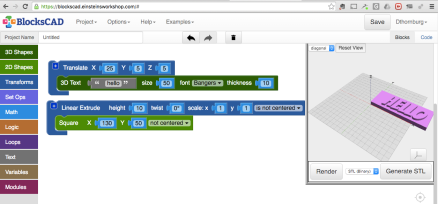
While cloud-based design tools for 3D printing have been around for awhile (e.g., Tinkercad), new and more powerful tools have arrived, such as BlocksCAD (blockscad.einsteinsworkshop.com).  This tool uses Scratch-like programming to design 3D shapes of amazing richness and complexity.

My point is that the maker movement in education is supported on many levels ― from the new standards to the new technologies and beyond.  It is time for heads and hands to be unified in support of learning across all grades and subjects.

Meet the author

Dr. Thornburg and his colleagues conduct workshops on maker technologies ranging from 3D printing to using the HyperDuino technology with Chrome.  He can be reached at david@tcse-k12.org.

There has been a recent push toward a more progressive approach to education that is likely to have a positive impact at all grades and across all subject areas. This move is based on Seymour Papert’s ideas of “constructionism” in which learning is demonstrated by the creation of artifacts that are separate from the learner herself. As Papert has said, it doesn’t matter if the expression is a poem or a sand castle – the fact that it exists outside the learner where it can be shared with others is the critical part. John Dewey famously said, “I don’t care what a child knows; I care what he can do with what he knows.”

This shift from knowing to doing is reflected in the Next Generation Science Standards where the focus is not on learning about science, but learning how to think and act like a scientist. The same approach applies to other subjects – from mathematics to the arts – and the benefit of this approach is that it engages students and increases their learning.

One of the strategies that supports this shift is inquiry-driven project-based learning in which students start with a compelling question that drives the creation of projects to provide an answer to the question. For example, suppose a class is exploring the seasons. In early grades, questions might deal with why certain holidays are held during particular seasons. In later grades, a question might be whether or not seasons exist on other planets. If you want to bring the arts into the topic, there are rich areas of exploration from the music of Vivaldi (The Four Seasons) to Monet’s seasonal paintings of haystacks. In fact, a good starting point for this module would be to use a mind mapping tool like Freemind Screen Shot 2015-12-28 at 3.13.51 PM(http://freemind.sourceforge.net/) for students to use as they brainstorm a list of interesting questions. In short order, a list of 50-100 questions might get posed by a classroom full of students, any one of which could be an interesting project for a student. By having students work on individual questions and then sharing their work with the rest of the class, everyone benefits from the combined efforts and the depth of learning increases as a result.

What tool is best for creating projects? To me, the answer is Hyperstudio (http://www.mackiev.com/hyperstudio/). This product has amazing capabilities as a multimedia authoring tool. Basically, the user creates a stack of “cards” on the screen, each of which can have buttons, graphics, sounds, movies, narrations, text, etc. Once a project is completed it can be shared with others who can navigate through the stack to explore the project. In the case of a linear sequence of cards, a stack even can be converted to a movie for posting on YouTube. Because Hyperstudio works with both Macs and Windows, a student can start a project on one kind of computer and finish it on another. The versatility of this software is amazing.1 card sample

In fact, if it only did what I described, it would meet most people’s needs. However, as they say on late night television: “But wait, there’s more.” In addition to everything else, Hyperstudio has the built-in capability to interact with the Arduino interface card (https://www.arduino.cc/). This card connects to your computer through the USB port and allows you to read a wide variety of sensors (light, temperature, pressure, etc.) and control external devices (lights, motors, etc.) The result is that the virtual world of the computer is now extended to the physical realm, adding even more capabilities to student projects.

The Arduino is not without its challenges, however. First, the native programming language is a tricky to learn, especially for younger users. Second, the physical connection to sensors and lights requires additional components (resistors, etc.) that complicate the creation of a finished project.

Both of these challenges are nicely addressed with Hyperstudio. First, the programming tools for the Arduino are built into Hyperstudio using easy-to-understand commands that students at most grades easily can learn. Second, the need for external resistors, etc., is eliminated through the use of a plug-in card (called a shield) that greatly simplifies the process of making connections. This card is called the Hyperduino, (http:www.hyperduino.com).hyperduino

It plugs into the Arduino card and provides all the resistors an other components needed to supplement the lights, motors and sensors so the student can focus on the project itself, not the mechanics of connecting components. As Roger Wagner (designer of both Hyperstudio and the Hyperduino) has said: “The HyperDuino does for the maker movement what HyperStudio did for hypermedia: it makes it possible for everyone, regardless of age and experience, to create interactive maker projects.

The result is that student projects can have both a virtual and a physical component in which, in addition to a rich piece of multimedia on the computer screen, a physical model can be constructed with touch switches and LED lights that turn on or off to show aspects of the physical model that are related to what is being shown on the computer screen. The result raises the constructionist bar, and makes student projects even more compelling to those who experiment with them.

For example, if a student builds a physical model of something related to a season, the act of touching a switch can light up the model and have the computer go to a card related to the season and start playing a movement from Vivaldi’s Four Seasons. The point here is that everything is created by the students.

Because Hyperstudio stacks can launch each other, the teacher can create a master stack with buttons that link to each student’s project. This becomes a really neat thing to display during open houses so parents can see (and explore) the work of their own children as well as the work of others in the class. The greatest benefit, though, comes from students sharing their work with each other. This sharing is likely to trigger new questions that can result in even more work on the topic – all without the direct intervention of the teacher.

The result is a huge leap away from the traditional text-book driven model of education with the bulk of the work being moved into the hands of the students themselves. In fact, with a project like this, it is possible that teachers may learn something they didn’t know before. The excitement that comes from new learning makes everyone eager to learn more.

As mentioned before, the constructionist approach described here cuts across grade levels and subject areas. One would he hard-pressed to find a curricular area for which it doesn’t apply.

As for us, we are busy doing workshops with teachers that explore both the pedagogical underpinnings of this approach, as well as the mechanics of working with Hyperstudio and Hyperduino. Because we want the workshop to have an immediate impact on classrooms, every participant receives both the Hyperduino kit (including the Arduino board) as well as a full licensed copy of Hyperstudio. To schedule a workhop at your school, e-mail us using the form below.

Anatomy of an Illness

This blog is health related, and you are forgiven for skipping it if you wish – I just want my readers to know what happened to me last year – and to spread a tale of caution.  I will tell you that it has a happy ending!

Those of you who know me are likely aware that 2015 was a lousy year, healthwise. On the positive front, I had a very successful ablation that fixed my afib problem, but other than that, things got cruddy. First, while in the hospital, I contracted pneumonia and was on IV antibiotics for a long time to get that out of my system. While dealing with this, I was told by a pulmonologist that I had COPD – a chronic lung disease that made breathing hard, and was just going to get worse over time. My energy fell through the floor and the thought of going out on the speaking circuit was the last thing on my mind. I had a horrible cough, and my lungs were working at about 45% of normal.

The docs prescribed a couple of inhalers, but these did nothing. From the hospital I went to a rehab center for a week, and then went for outpatient respiratory rehab. I was the only one in the group who had not been a smoker, which I found strange, but was told that it sometimes happens.

In the meantime, my thyroid went through the roof, and my endocrinologist attributed this to a side effect of my old heart medicine, Amiodarone. Fortunately, Prednisone and Hydrocortisone took care of this problem, after which I was being weaned off the steroids.

One problem solved, but the lungs were still lousy – and getting worse.

After about 9 months of nasty lung problems, we went to California to visit friends and Norma suggested that I see another pulmonologist to get a second opinion. This new doc listened to my lungs and did a breathing test. In short order, he told me that, while he wasn’t positive what I had, it surely wasn’t COPD! In short order he eliminated a bunch of other nasty causes and thought that it might be another well-known side effect of Amiodarone. The good news, in that case, is that the problem would be reversible. By this point, my lungs were only working at 35% – not the best news by a long shot!

After a couple of days in the California hospital for tests (I’ll spare you the details), the decision was made to load me up with Prednisone again since that was known to help with Amiodarone pulmonary toxicity.

It turns out that, while it was easy to find that the problem was NOT (COPD), proving that it was another Amiodarone side effect was much trickier. From my perspective, though, my health started turning around for the better almost immediately, no matter what the underlying cause was. The coughing went way down, my breathing got better (some days it is almost normal), my energy is recovering and I’ve rejoined the human race.

At this point, I’m being weaned off the Prednisone again (apparently it has problems of its own) and every day I get a little bit better. My friends have all noticed that I’m back! I have a busy speaking schedule for 2016 and two new workshops that we are scheduling, safe in the knowledge that I’ll be in great shape. I’ll be at FETC and TCEA, and I hope to see some of you there!

While I’m getting a new pulmonologist in the Chicago area, I’m still flying to California every month or so to see the doc that put me on the fast track to recovery! The big question remaining for me is how I could have been so badly misdiagnosed in the first place. I know that medicine is not an exact science, but I’m one of those guys who trusts what doctors say. Mistakes happen. I have a PhD and I’ve made my share of blunders, so why should I hold other highly educated people to higher standards?

At this point, I’m just moving forward. A nasty health scare gives you perspective and helps set priorities. In my, case, this means putting family and friends first. And that reminder makes all the lousiness of 2015 worth it!  So, for those of you who knew something was going on, I thank you for your support and look forward to seeing lots of you next year at some of the conferences I’m attending!


For several years I’ve been promoting virtual environments as a way to help build STEM skills in students.  This work culminated in the creation of the educational holodeck ― a hybrid learning space that blended the physical world of furniture with the virtual world of computers.  For example, we converted a room into a virtual mission to Mars, with a large viewscreen in the front of the room where students could see where they were going.

As enticing as this environment was, the images were flat 2-D representations.  Even so, the environment was quite compelling to most students.

About two years ago a friend of mine encouraged me to see a new environment ― zSpace ― that generated highly interactive 3-D models of everything from living organisms to physics experiments.  This system uses a special computer and glasses with markers on them so that, as you move your head, your point of view changes.  Using a special stylus, you can reach into a model and pull pieces of it apart.  The traditional frog dissection, for example, is supported in this system quite nicely, and without the mess!

One of the things I saw in the original demo was a physics modeling environment incorporating ramps and balls.  The behavior of the system mirrored that of real-world experiments, without having loose parts falling on the floor or getting lost.

The timing of zSpace couldn’t be better.  With the roll-out of the Next Generation Science Standards in many states, the emphasis is on experimentation and modeling, not on lectures and textbooks.  Of course educators need to set the stage, but once that is done, the students are expected to explore topics by modeling the behavior of real scientists.  In other words, the shift is from learning about science, to actually doing experiments.

The fact that experimentation using zSpace is virtual is not a problem because objects have true 3-D representation.  The potential of this technology to transform STEM education is very high!

If you want to see this environment for yourself, free educational seminars are being offered across the country by zSpace. Please register at http://zspace.com/eduseminar. In my opinion, this is a technology worth watching closely

I’ve had the Polar3D (www.polar3d.com) printer for a couple of months and it is a delight to use. Norma found this printer at the ISTE conference, and it generated a lot of interest.

If you use PLA filament, the adhesive to the glass base plate is simply hairspray.  It does raftless printing very well so there is often no scrap to remove, and the print quality is amazing. The designers really thought this printer through.  It works right out of the box – no calibration required.  Filament loading and unloading is a breeze.  The initial software setup takes some work (and can be improved) but once done, you are all set.  The only challenge I’ve had is when I take the printer on the road and have to switch to a different network, but the phone help is quite patient with me.

Polar3D

Unlike my other printers, it prints from the cloud, so your stl files are saved in your online account.   Also, a built-in camera lets you see your job as it is printing from anywhere in the world you are logged in.

An advantage in school settings is that several printers can be set up in a central location and print jobs can be sent from any classroom using any internet-connected device.  This is clearly a printer worth looking at!

That said, this is a dynamic field and I’ll  be keeping my eyes open.

Like many of my generation, life changed a bit when Sputnik was launched in October, 1957. While many of my classmates were interested in rocketry, my own interest was more in the field of electronics – the instruments needed to make measurements of temperature, pressure, and other data that was then sent back to Earth by radio. Because I was an amateur radio operator at the time (K9SRW) who built all my own equipment, this was a natural extension of then-current interests. I remember walking part way home from high school just so I could stop at a local Army surplus store packed with boxes of resistors, capacitors, and other components including the transistors needed to build amplifiers, oscillators, and other circuits one might need.

Since, as I said, rocketry was not my goal, I looked for any way to get a project off the earth, even if it didn’t go into orbit. As a result, in 1961, the method I chose (helium-filled weather balloons) was not only inexpensive, it could be used to carry a pretty heavy payload (two kg or so). With my focus on the electronics, I built the transmitter, and the attachments needed to measure altitude, temperature, air pressure, luminosity, and to send the legally required Identification signal. All of these circuits were modular, and a lot of time was spent making sure everything worked. My father provided a photographic plate to see if I could detect cosmic rays (assuming I would get the plate back from the experiment so it could be developed.)

The finished payload was a cube about 30 cm on a side, and I built two of them – one in Styrofoam for launch, and one in clear plastic for testing and display for a science fair at my high school. I called the experiment Project HiBall (for high balloon, of course) and on launch day I just hoped everything worked.

Fortunately, the experiment was a success. The balloon headed west, and landed a day later on a farm in Iowa where a kind farmer found it and sent it to me. The data was not earth-shattering, but the experiments mostly worked as planned and the resulting science fair project was well-received, taking me to the State finals. While my interest in STEM subjects had already been formed, there is little question that this project strengthened these interests, setting the trajectory for my continued education.

SCAN0243

The reason I shared this experience with you is because, today, even more amazing options are available. The first technology to mention is the CubeSat- small (10 cm/side, about 1 kg)) satellites for student projects that stay in low-earth orbits for about a year (www.nasa.gov/mission_pages/cubesats/). While most of the projects are done by college students, there is a special opportunity to expand this access to high school students. This project (ArduSat – http://www.ardusat.com) is based on the popular Arduino board used to send and receive data from all kinds of sensors and actuators. While most Arduino projects reside here on Earth, the Ardusat system lets students design and test experiments in their classroom that can then be sent to an Arduino-based CubeSat for testing in space. From my historical perspective, this is staggering!ardusat

The Arduino board connects to a computer and has numerous inputs and outputs for both digital and analog data. The Ardusat student kit includes some special sensors for luminosity, temperature, an accelerometer, gyroscope, magnetometer, barometer, UV sensor, infrared thermopile and other data sources. The whole kit is only $150 which is a bargain considering the specialized sensors it contains. While experiments can be designed and tested here on Earth, finished Arduino programs can be sent 450 km up to the Ardusat where experiments can be done and the data sent to Earth.

This goes way beyond what I was doing in 1961 in two very important ways. First, the experiments are done on an orbiting satellite. Second, the projects can be done by students without them having to design all the sensors and other equipment themselves. This has the effect of democratizing the endeavor, bringing an amazing opportunity for STEM education to students everywhere.

In addition to the hardware kits, Ardusat also has a lot of activities and experiments that can be downloaded and explored – including tutorials on the hardware itself. This material is generally released under a Creative Commons copyright, making it perfect for free classroom use.

In addition to the tutorials and other resources, the activities are keyed to both the Next Generation Science and the Common Core Standards. This adds value in that teachers can see how Ardusat projects tie into the standards they are expected to support without having to wade through the massive standards documents themselves.

There is no question in my mind that the project I did ages ago helped guide me into the sciences. What excites me more is that projects like Ardusat will achieve this result for thousands of kids who well then go on to invent our future.